Navigation 2 Logo
latest
  • Getting Started
    • Installation
    • Running the Example
    • Navigating
  • Build and Install
    • Install
    • Build
      • Build Navigation2 For Released Distribution
        • Install ROS
        • Build Navigation2
      • Quickstart Build Main
        • Steps
        • Options
      • Manually Build Main
        • Build ROS 2 Main
        • Build Navigation2 Dependencies
        • Build Navigation2 Main
    • Docker
      • Building Docker Container
      • Using DockerHub Container
    • Generate Doxygen
    • Help
      • Build Troubleshooting Guide
        • Common Navigation2 Dependencies Build Failures
        • Reporting Issue
  • Navigation Concepts
    • ROS 2
      • Action Server
      • Lifecycle Nodes and Bond
    • Behavior Trees
    • Navigation Servers
      • Planner, Controller, and Recovery Servers
      • Planners
      • Controllers
      • Recoveries
      • Waypoint Following
    • State Estimation
      • Standards
      • Global Positioning: Localization and SLAM
      • Odometry
    • Environmental Representation
      • Costmaps and Layers
      • Costmap Filters
      • Other Forms
    • Navigation2 Academic Overview
  • First-Time Robot Setup Guide
    • Setting Up Transformations
      • Transforms Introduction
      • Static Transform Publisher Demo
      • Transforms in Navigation2
      • Conclusion
    • Setting Up The URDF
      • URDF and the Robot State Publisher
      • Setting Up the Environment
      • Writing the URDF
      • Build and Launch
      • Visualization using RVIZ
      • Adding Physical Properties
      • Conclusion
  • General Tutorials
    • Camera Calibration
      • Overview
      • Requirements
      • Tutorial Steps
    • Get Backtrace in ROS2 / Nav2
      • Overview
      • Preliminaries
      • From a Node
      • From a Launch File
      • From Navigation2 Bringup
      • Automatic backtrace on crash
    • Navigating with a Physical Turtlebot 3
      • Overview
      • Requirements
      • Tutorial Steps
        • 0- Setup Your Enviroment Variables
        • 1- Launch Turtlebot 3
        • 2- Launch Navigation2
        • 3- Launch RVIZ
        • 4- Initialize the Location of Turtlebot 3
        • 5- Send a Goal Pose
    • (SLAM) Navigating While Mapping
      • Overview
      • Requirements
      • Tutorial Steps
        • 0- Launch Robot Interfaces
        • 1- Launch Navigation2
        • 2- Launch SLAM
        • 3- Working with SLAM
    • (STVL) Using an External Costmap Plugin
      • Overview
      • Costmap2D and STVL
      • Tutorial Steps
        • 0- Setup
        • 1- Install STVL
        • 1- Modify Navigation2 Parameter
        • 2- Launch Navigation2
        • 3- RVIZ
    • Dynamic Object Following
      • Overview
      • Tutorial Steps
        • 0- Create the Behavior Tree
        • 1- Setup Rviz clicked point
        • 2- Run Dynamic Object Following in Navigation2 Simulation
    • Navigating with Keepout Zones
      • Overview
      • Requirements
      • Tutorial Steps
        • 1. Prepare filter mask
        • 2. Configure Costmap Filter Info Publisher Server
        • 3. Enable Keepout Filter
        • 4. Run Navigation2 stack
    • Navigating with Speed Limits
      • Overview
      • Requirements
      • Tutorial Steps
        • 1. Prepare filter mask
        • 2. Configure Costmap Filter Info Publisher Server
        • 3. Enable Speed Filter
        • 4. Run Navigation2 stack
  • Plugin Tutorials
    • Writing a New Costmap2D Plugin
      • Overview
      • Requirements
      • Tutorial Steps
        • 1- Write a new Costmap2D plugin
        • 2- Export and make GradientLayer plugin
        • 3- Enable the plugin in Costmap2D
        • 4- Run GradientLayer plugin
    • Writing a New Planner Plugin
      • Overview
      • Requirements
      • Tutorial Steps
        • 1- Creating a new Planner Plugin
        • 2- Exporting the planner plugin
        • 3- Pass the plugin name through params file
        • 4- Run StraightLine plugin
    • Writing a New Controller Plugin
      • Overview
      • Requirements
      • Tutorial Steps
        • 1- Create a new Controller Plugin
        • 2- Exporting the controller plugin
        • 3- Pass the plugin name through the params file
        • 4- Run Pure Pursuit Controller plugin
    • Writing a New Behavior Tree Plugin
      • Overview
      • Requirements
      • Tutorial Steps
        • 1- Creating a new BT Plugin
        • 2- Exporting the planner plugin
        • 3- Add plugin library name to config
        • 4- Run Your Custom plugin
    • Writing a New Recovery Plugin
      • Overview
      • Requirements
      • Tutorial Steps
        • 1- Creating a new Recovery Plugin
        • 2- Exporting the recovery plugin
        • 3- Pass the plugin name through params file
        • 4- Run Recovery plugin
  • Configuration Guide
    • Waypoint Follower
      • Parameters
      • Provided Plugins
        • WaitAtWaypoint
        • PhotoAtWaypoint
        • InputAtWaypoint
      • Default Plugin
      • Example
    • Behavior-Tree Navigator
      • Parameters
      • Example
    • Behavior Tree XML Nodes
      • Action Plugins
        • Wait
        • Spin
        • BackUp
        • ComputePathToPose
        • FollowPath
        • NavigateToPose
        • ClearEntireCostmap
        • ReinitializeGlobalLocalization
        • TruncatePath
      • Condition Plugins
        • GoalReached
        • TransformAvailable
        • DistanceTraveled
        • GoalUpdated
        • InitialPoseReceived
        • IsStuck
        • TimeExpired
        • IsBatteryLow
      • Control Plugins
        • PipelineSequence
        • RoundRobin
        • RecoveryNode
      • Decorator Plugins
        • RateController
        • DistanceController
        • SpeedController
        • GoalUpdater
      • Example
    • Costmap 2D
      • Costmap2D ROS Parameters
      • Default Plugins
      • Plugin Parameters
        • Static Layer Parameters
        • Inflation Layer Parameters
        • Obstacle Layer Parameters
        • Voxel Layer Parameters
        • Range Sensor Parameters
      • Costmap Filters Parameters
        • Keepout Filter Parameters
        • Speed Filter Parameters
      • Example
    • Lifecycle Manager
      • Parameters
      • Example
    • Planner Server
      • Parameters
      • Default Plugins
      • Example
    • NavFn Planner
      • Parameters
      • Example
    • Smac Planner
      • Parameters
      • Example
    • Controller Server
      • Parameters
      • Provided Plugins
        • SimpleProgressChecker
        • SimpleGoalChecker
        • StoppedGoalChecker
      • Default Plugins
      • Example
    • DWB Controller
      • Controller
        • DWB Controller
        • XYTheta Iterator
        • Kinematic Parameters
        • Publisher
      • Plugins
        • LimitedAccelGenerator
        • StandardTrajectoryGenerator
      • Trajectory Critics
        • BaseObstacleCritic
        • GoalAlignCritic
        • GoalDistCritic
        • ObstacleFootprintCritic
        • OscillationCritic
        • PathAlignCritic
        • PathDistCritic
        • PreferForwardCritic
        • RotateToGoalCritic
        • TwirlingCritic
      • Example
    • Map Server / Saver
      • Map Saver Parameters
      • Map Server Parameters
      • Costmap Filter Info Server Parameters
      • Example
    • AMCL
      • Parameters
      • Example
    • Recovery Server
      • Recovery Server Parameters
      • Default Plugins
      • Spin Recovery Parameters
      • BackUp Recovery Parameters
      • Example
    • Regulated Pure Pursuit
      • Regulated Pure Pursuit Parameters
      • Example
  • Navigation Plugins
    • Costmap Layers
    • Costmap Filters
    • Controllers
    • Planners
    • Recoveries
    • Waypoint Task Executors
    • Goal Checkers
    • Progress Checkers
    • Behavior Tree Nodes
  • Migration Guides
    • Dashing to Eloquent
      • New Packages
      • New Plugins
      • Navigation2 Architectural Changes
    • Eloquent to Foxy
      • General
      • Server Updates
      • New Plugins
      • Map Server Re-Work
      • New Particle Filter Messages
      • Selection of Behavior Tree in each navigation action
      • FollowPoint Capability
      • New Costmap Layer
    • Foxy to Galactic
      • NavigateToPose BT-node Interface Changes
      • BackUp BT-node Interface Changes
      • BackUp Recovery Interface Changes
      • Groot Support
      • New Plugins
      • Costmap Filters
      • SmacPlanner
      • RegulatedPurePursuitController
      • Costmap2D current_ Usage
      • Standard time units in parameters
      • Ray Tracing Parameters
      • Obstacle Marking Parameters
  • Getting Involved
    • Getting Involved
    • Process
    • Licensing
    • Developer Certification of Origin (DCO)
  • About and Contact
    • Robots Using
    • Related Projects
    • ROS to ROS 2 Navigation
    • About
    • Contact
  • Projects for 2020 Summer Student Program
    • 1. Create a Configuration Assistant (Analog to MoveIt)
    • 2. Create New Planner and Controller Plugins
    • 3. Port Grid Maps to ROS 2 and Environmental Model
    • 4. Advanced Navigation Testing Framework
    • 5. Navigation Branding and Website
    • 6. 2D/3D Localization Improvements
    • 7. Navigation Dynamic Obstacle Integration
Navigation 2
Edit
  • »
  • General Tutorials »
  • Navigating with a Physical Turtlebot 3

Navigating with a Physical Turtlebot 3

  • Overview
  • Requirements
  • Tutorial Steps

Overview

This tutorial shows how to control and navigate Turtlebot 3 using the ROS 2 Navigation2 on a physical Turtlebot 3 robot. Before completing this tutorials, completing Getting Started is highly recommended especially if you are new to ROS and Navigation2.

This tutorial may take about 1 hour to complete. It depends on your experience with ROS, robots, and what computer system you have.

Requirements

You must install Navigation2, Turtlebot3. If you don’t have them installed, please follow Getting Started.

Tutorial Steps

0- Setup Your Enviroment Variables

Run the following commands first whenever you open a new terminal during this tutorial.

  • source /opt/ros/<ros2-distro>/setup.bash
  • export TURTLEBOT3_MODEL=waffle

1- Launch Turtlebot 3

You will need to launch your robot’s interface,

ros2 launch turtlebot3_bringup robot.launch.py  use_sim_time:=False
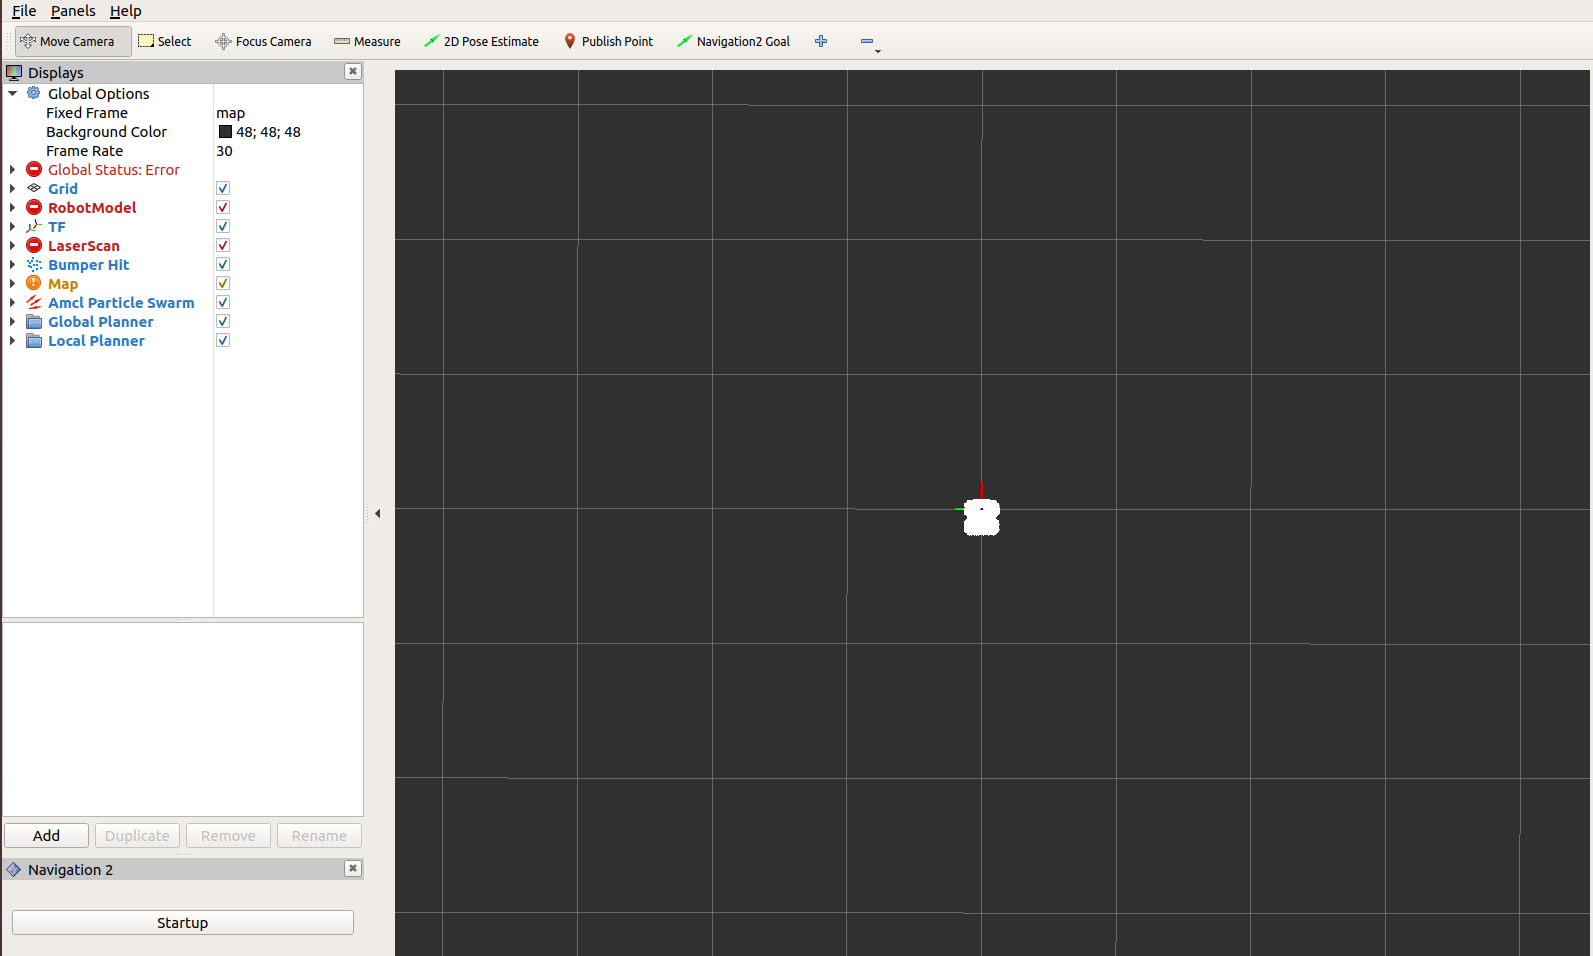
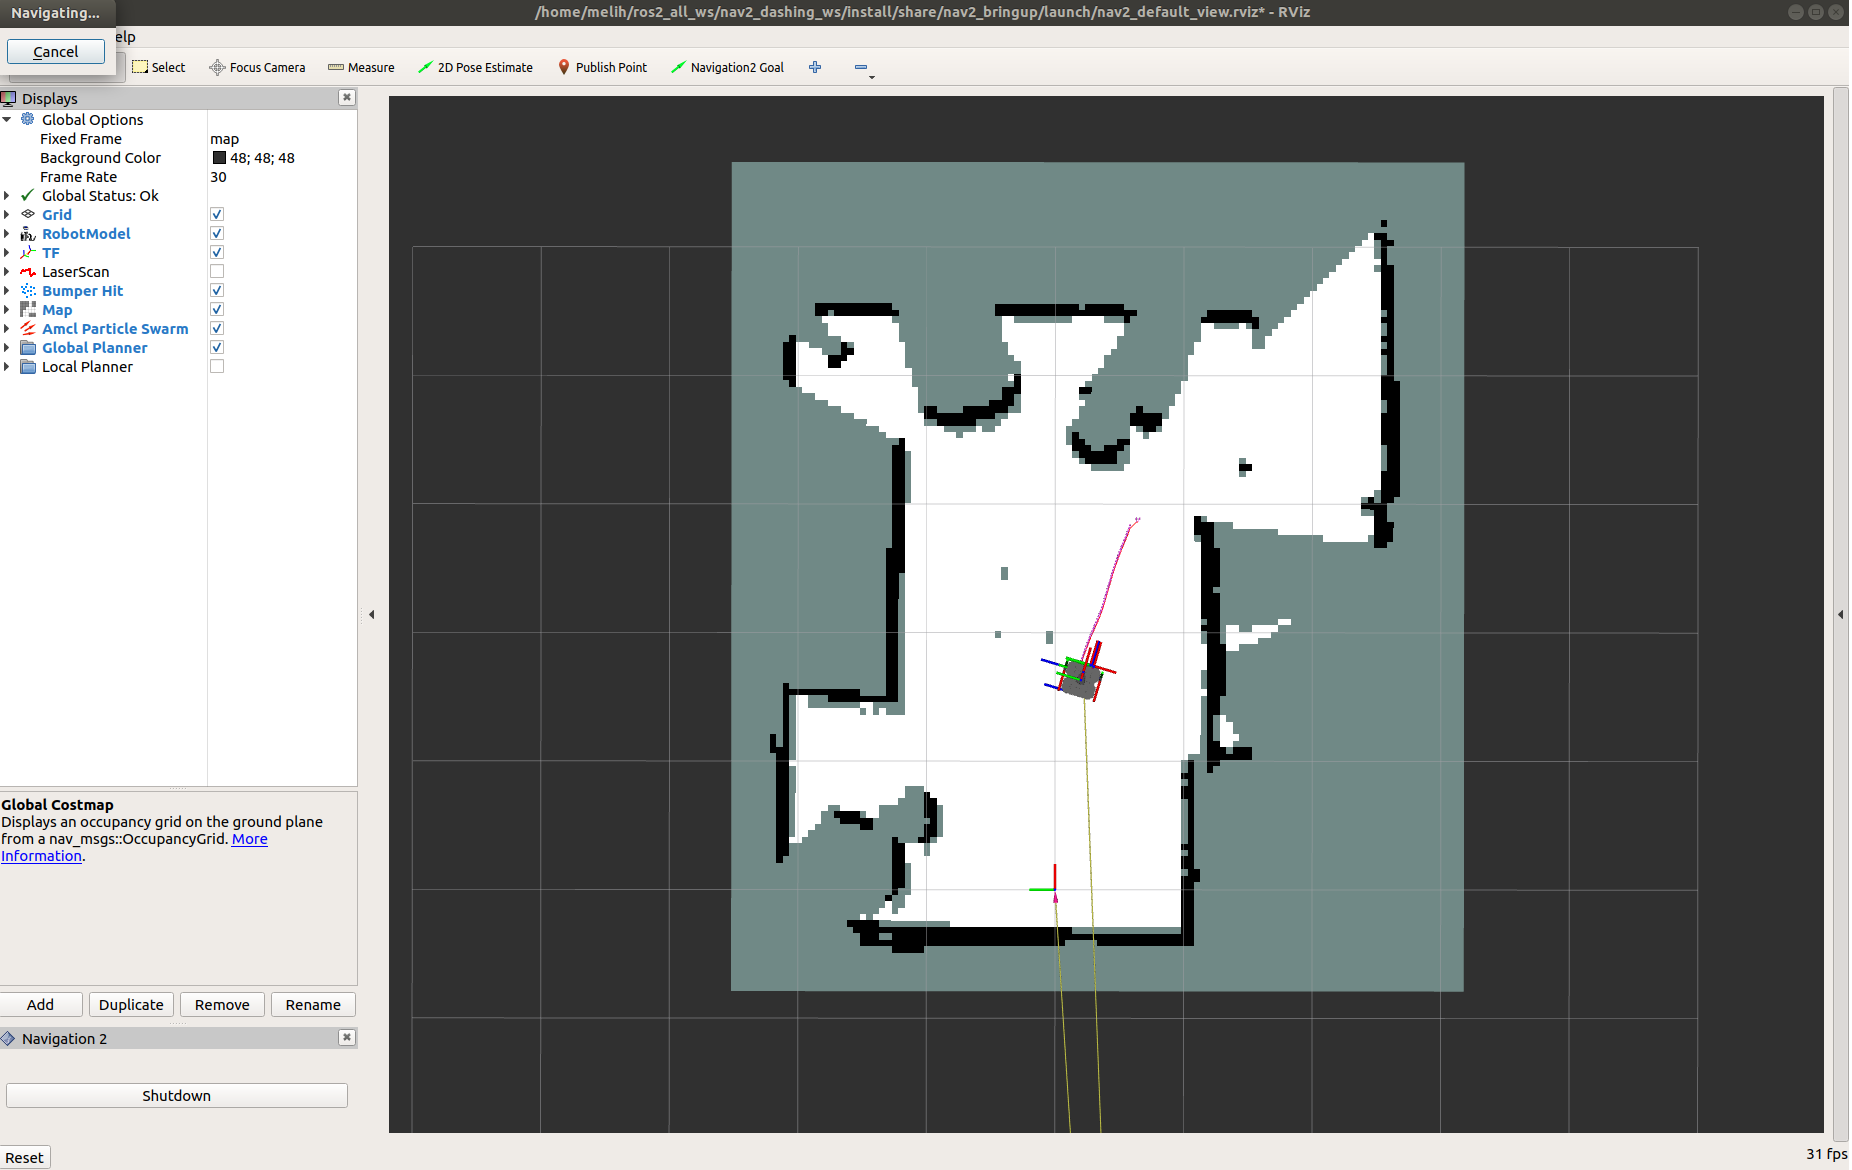
2- Launch Navigation2

You need to have a map of the environment where you want to Navigate Turtlebot 3, or create one live with SLAM.

In case you are interested, there is a use case tutorial which shows how to use Navigation2 with SLAM. Navigation2 with SLAM

Required files:

  • your-map.map
  • your-map.yaml

<your_map>.yaml is the configuration file for the map we want to provide Navigation2. In this case, it has the map resolution value, threshold values for obstacles and free spaces, and a map file location. You need to make sure these values are correct. More information about the map.yaml can be found here.

Launch Navigation 2. If you set autostart:=False, you need to click on the start button in RViz to initialize the nodes. Make sure use_sim time is set to False, because we want to use the system time instead of the time simulation time from Gazebo.

ros2 launch nav2_bringup bringup_launch.py use_sim_time:=False autostart:=False map:=/path/to/your-map.yaml

Note: Don’t forget to change /path/to/your-map.yaml to the actual path to the your-map.yaml file.

3- Launch RVIZ

Launch RVIZ with a pre-defined configuration file.

ros2 run rviz2 rviz2 -d $(ros2 pkg prefix nav2_bringup)/share/nav2_bringup/launch/nav2_default_view.rviz

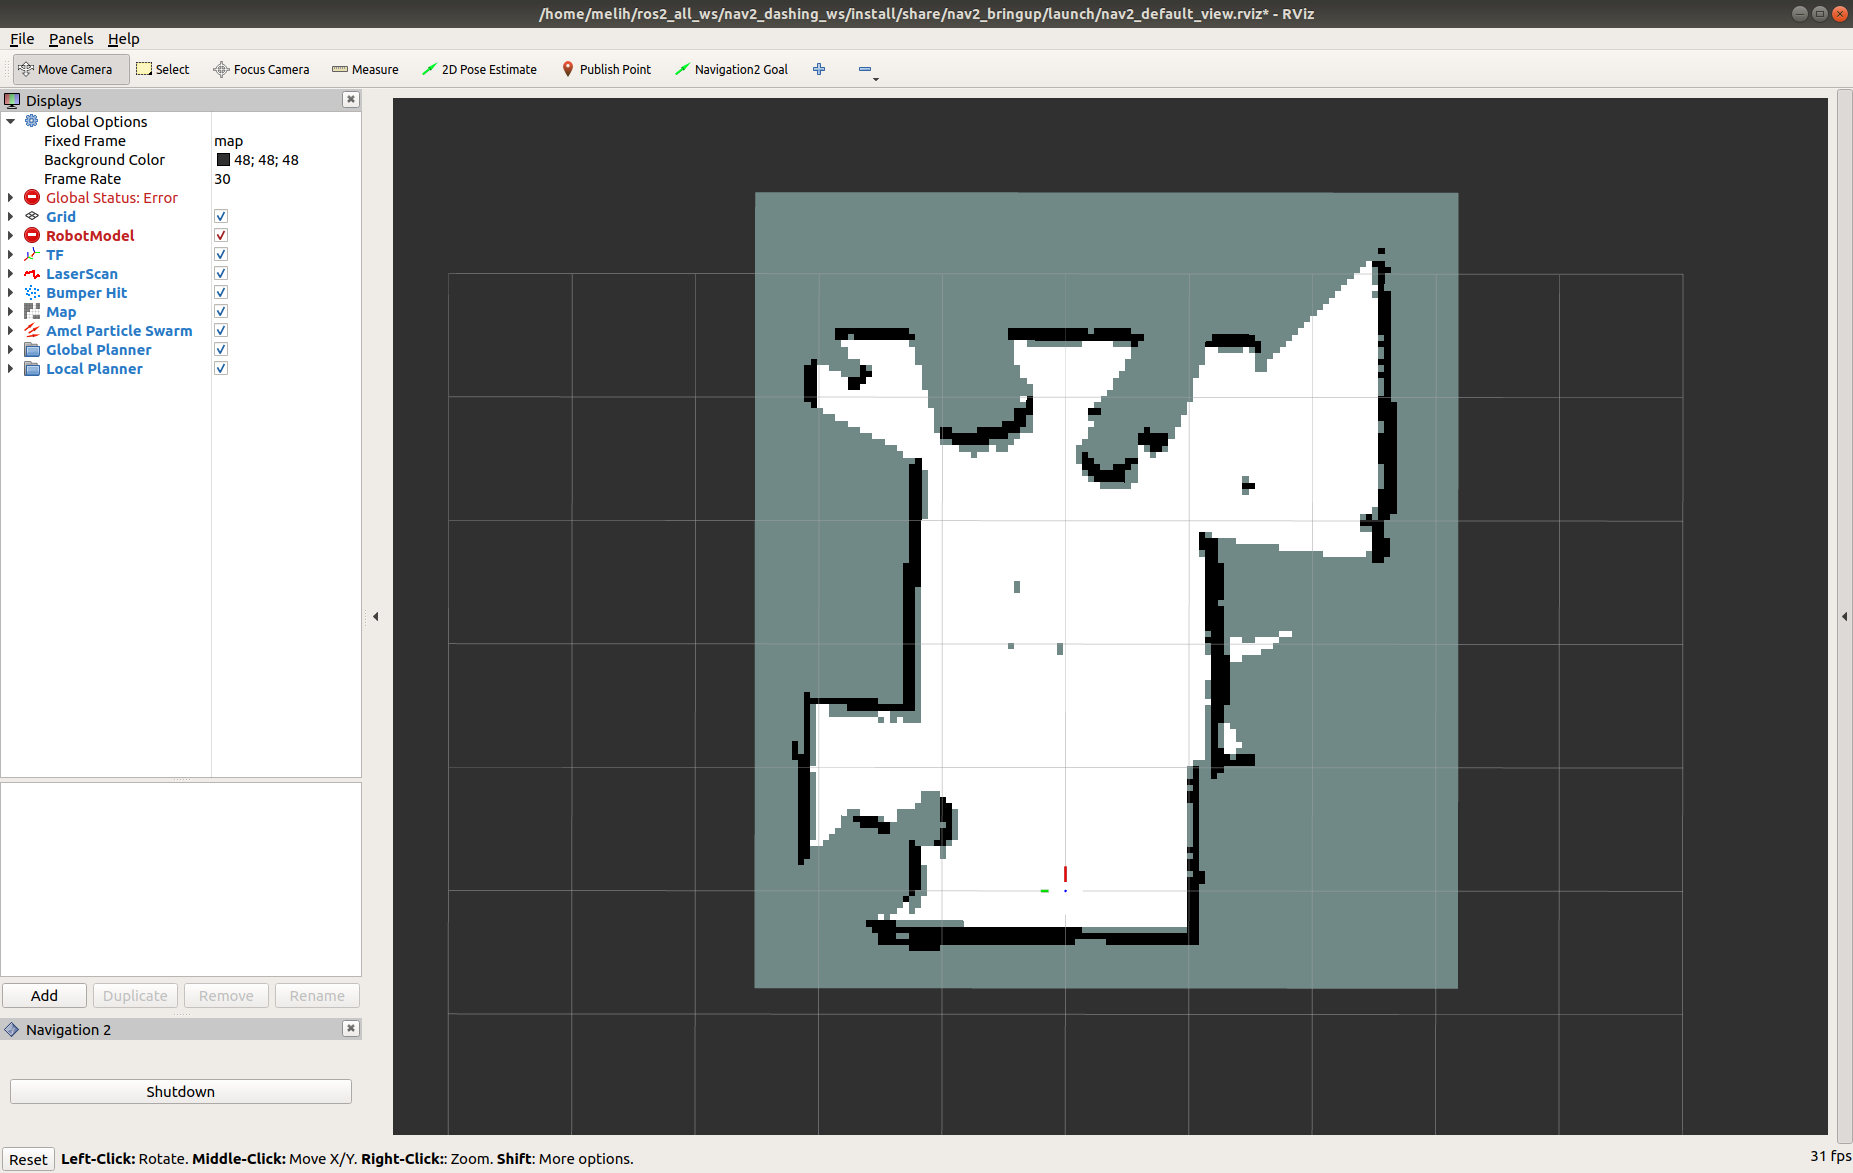
Now, you should see a shadow of Turtlebot 3 robot model in the center of the plot in Rviz. Click on the Start button (Bottom Left) if you set the auto_start parameter to false. Then, the map should appear in RViz.

../../_images/rviz_after_launch_view.png ../../_images/rviz_slam_map_view.png

4- Initialize the Location of Turtlebot 3

First, find where the robot is on the map. Check where your robot is in the room.

Set the pose of the robot in RViz. Click on the 2D Pose Estimate button and point the location of the robot on the map. The direction of the green arrow is the orientation of Turtlebot.

Set initial pose in RViz

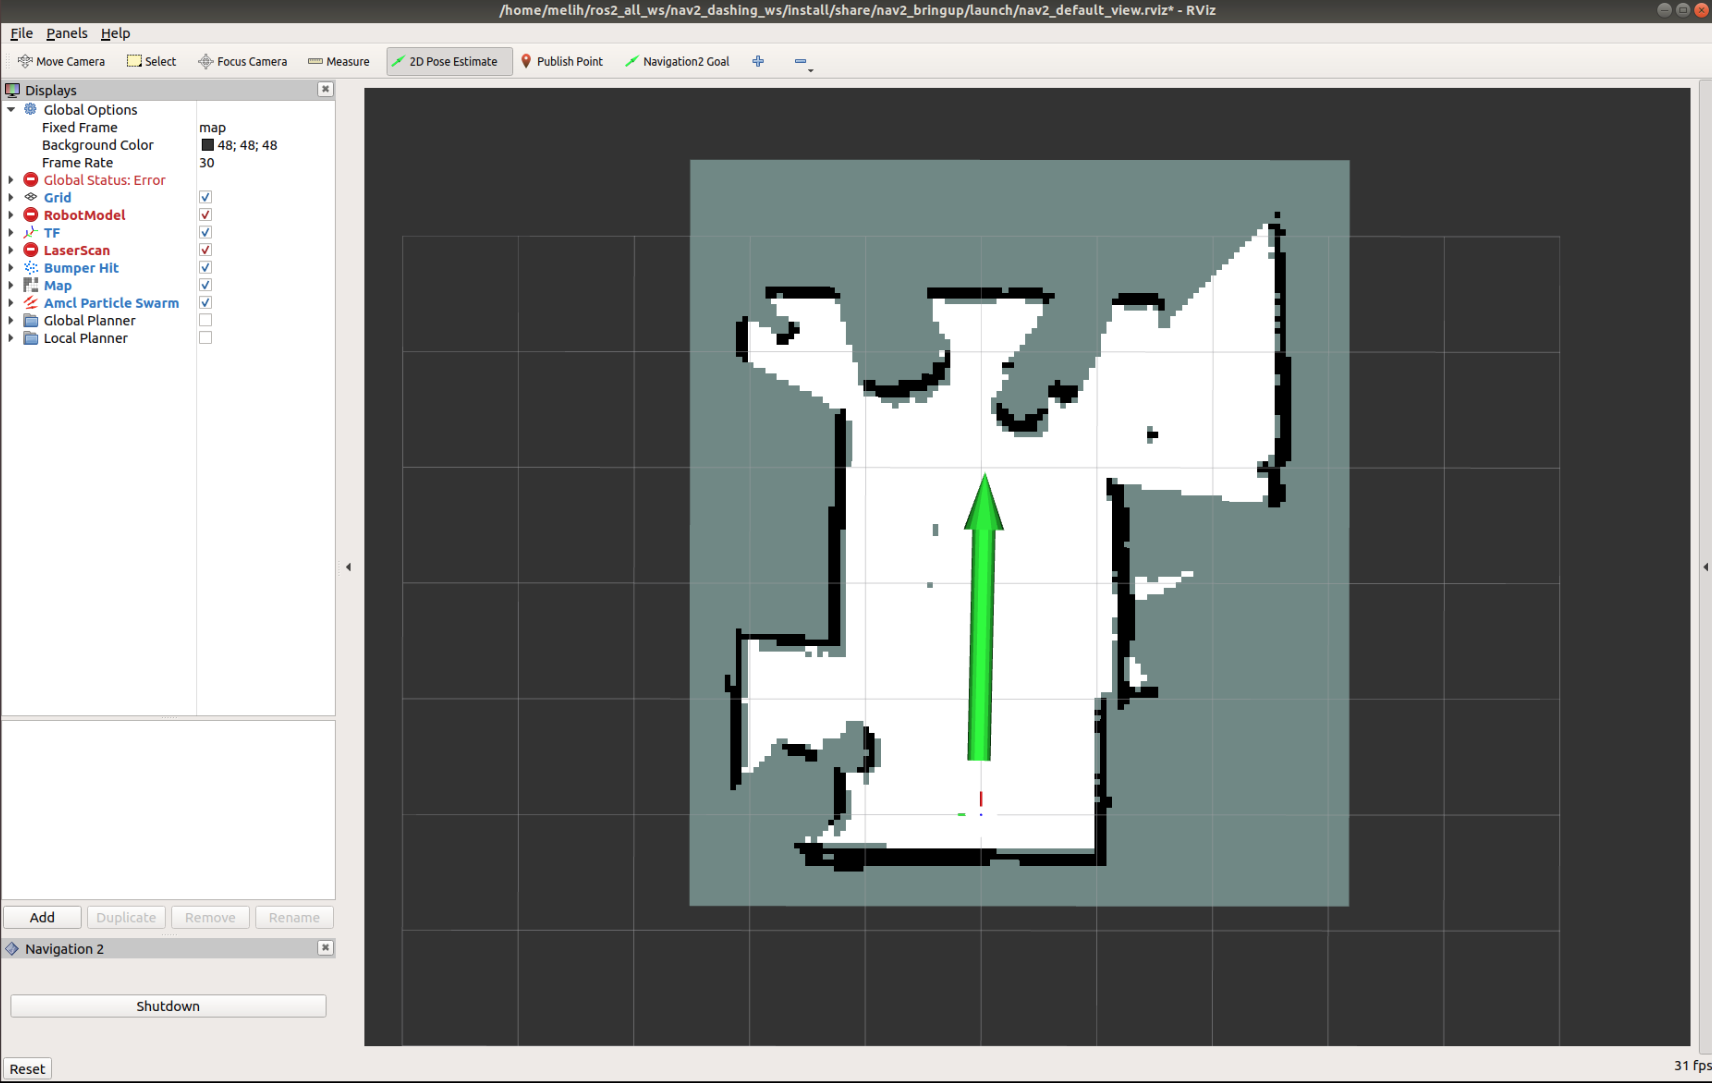
Now, the 3D model of Turtlebot should move to that location. A small error in the estimated location is tolerable.

5- Send a Goal Pose

Pick a target location for Turtlebot on the map. You can send Turtlebot 3 a goal position and a goal orientation by using the Navigation2 Goal or the GoalTool buttons.

Note: Navigation2 Goal button uses a ROS 2 Action to send the goal and the GoalTool publishes the goal to a topic.
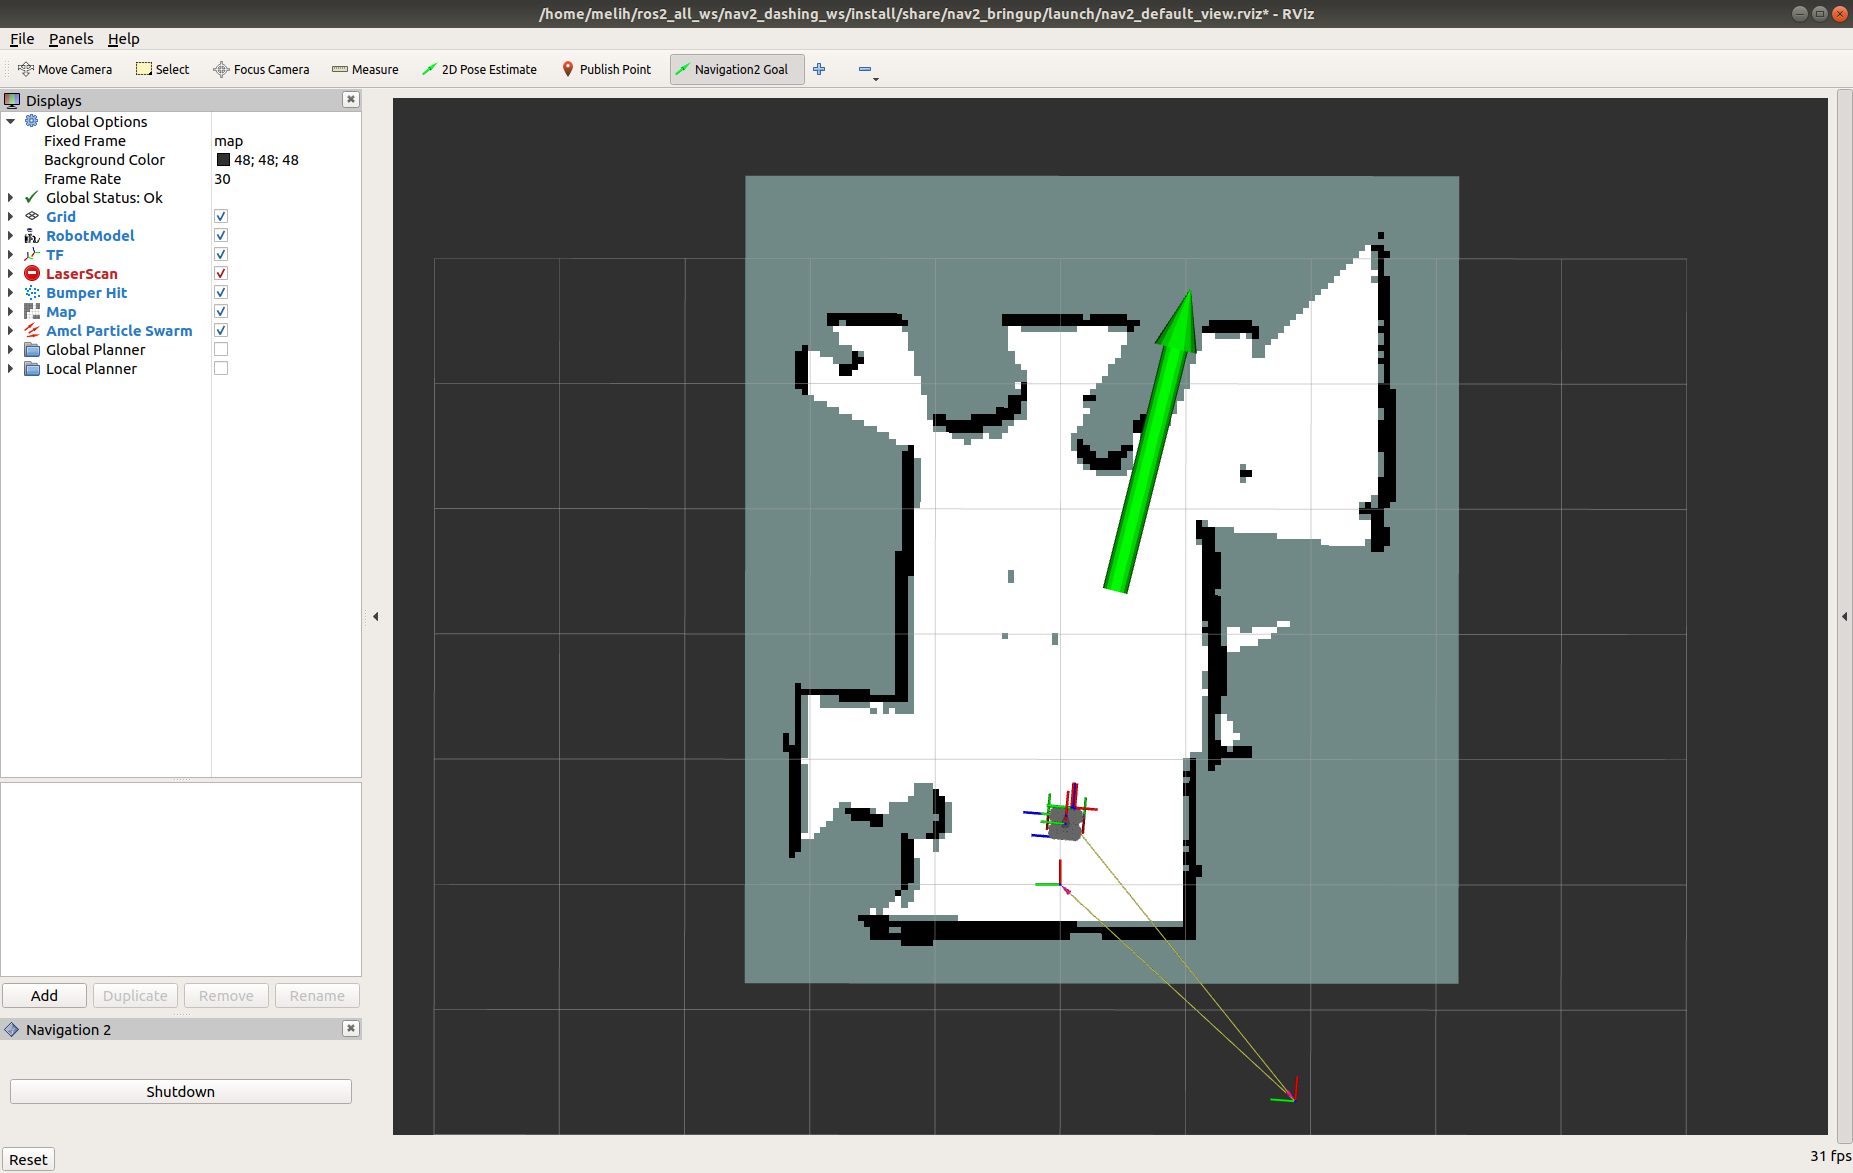
Send goal pose in RViz

Once you define the target pose, Navigation2 will find a global path and start navigating the robot on the map.

Robot navigating in RViz

Now, you can see that Turtlebot 3 moves towards the goal position in the room. See the video below.


© Copyright 2020.